We hope this basic crochet information helps you in your crochet pursuits. Images on the left side of each description show hand positions for left-handed crocheters, on the right show hand positions for right-handed crocheters. See also video lessons for left-handed crocheters and right-handed crocheters.
Holding the Hook
There are two common ways to hold a crochet hook. The first is to hold the hook between your thumb and index finger like a pencil. (D18)
Left-Handers

Right-Handers

The second is to hold the hook in an overhand manner, like a knife. (D19)


Making the Slip Knot
The first step in crochet is to make a slip knot. Making a pretzel shape with the yarn, slip your hook into the pretzel. (D22)


Pull on both ends of the yarn to tighten and adjust the size of the knot and adjust the loop. (D23)


Holding the Yarn
Here's one way to hold the yarn. Feel free, however, to do what feels right for you. Holding the slip knot in your left hand, twine the yarn through the fingers of your right hand.
Moving the slip knot to your right hand, lightly hold the knot between your thumb and middle finger as shown. When you crochet, you will use the section of yarn that runs between the hook and your right index finger. (D24)


Your index finger will move up and down as you work to create an even tension or tightness in the yarn.
Making the Foundation Chain
Almost every crochet project begins with a foundation chain. The stitches look like a chain, therefore the name. You will build row upon row of stitches on this foundation chain.
First, make a slip knot. Then hold the yarn as shown for a yarn over. With the hook in front, yarn over and bring the hook under and up to catch the yarn. (D27)


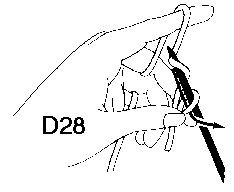
Turn the hook so it faces downward, slide it through the original loop, and bring the yarn with it. (D28)


You have just made one chain stitch! Practice this technique until you can make them fluidly and evenly. Count the stitches as shown in the illustration below. Never count the loop around the hook as a stitch. (D30)


Turning Chains
When crocheting in rows, you need to chain a certain number of stitches before starting each new row. These chain stitches are called turning chains. They are necessary to keep the edges of your work even.
Each type of stitch has a standard number of turning chains that are equal in height to the height of the stitch. (D66 & D67)


| # of Turning Chains | Is Equal To |
| 4 | Treble Crochet |
| 3 | Double Crochet |
| 2 | Half Double Crochet |
| 1 | Single Crochet |
| 0 | Slip Stitch |
More on Foundation and Turning Chains
When crocheting into a foundation chain, you need to skip a certain number of chains before working your first stitch into the foundation. Another way to think of it is making "extra" foundation chains that will serve as the turning chain. For example, if you want to end up with 12 single crochet stitches, you need to start with a foundation chain of 13 (12 plus 1).
And after you have completed your row of stitches, you also need to crochet a certain number of chains for the turning chain. This chart will help you remember how many chains you need in the turning chain for each type of stitch.
This chart also answers these common questions:
- where do I insert my hook when I start a new row?
- when do I count the turning chain as a stitch?
- when do I work into the turning chain on the row below?
| Crochet Stitch | Number of Chains to skip at beginning of foundation chain | Number of Chains to make before begin next row (for turning chain) | Count Turning Chain as Stitch? | Work into Turning Chain on row below? | Insert hook at beginning of row: |
| Slip Stitch | 0 (insert hook into 1st chain from hook) |
0 | N/A | N/A | In 1st stitch |
| Single Crochet | 1 (insert hook into 2nd chain from hook) |
1 | No | No | In 1st stitch |
| Half Double Crochet | 2 (insert hook into 3rd chain from hook) |
2 | No | No | In 1st stitch |
| Double Crochet | 3 (insert hook into 4th chain from hook) |
3 | Yes | Yes | In 2nd stitch |
| Triple Crochet | 4 (insert hook into 5th chain from hook) |
4 | Yes | Yes | In 2nd stitch |
Yarn Over (yo) Explained
Catching the yarn with the hook is part of every crochet stitch. Bring the yarn over the top of the hook, back to front, catching it in the groove of the hook. (D25)


Join to Form a Ring using Slip Stitch (sl st)
A slip stitch is used to join the first and last chains in a foundation chain to form a ring. This is the first step in making many motifs, including the ever popular granny square. Insert the hook into the first chain, under both the top part of the chain in the front and the back loop. (D90)


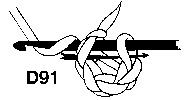
Yarn over, and bring the yarn through both the chain and the loop that is on the hook. You have completed one slip stitch, and have formed a ring. (D91)


To work into the ring, insert the hook into the center of the ring and work the crochet stitches as you would normally.
The slip stitch is also used to join rounds, crochet seams, or finish the edge of a project. You would not ordinarily make an entire crocheted item out of only slip stitches.
Fasten Off
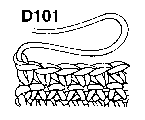
Work your last crochet stitch until you have two loops remaining. Cut the yarn, leaving at least a 4 inch tail. Draw the yarn through the last two loops. Tighten gently to prevent unravelling. (D101)


Weave in Loose Ends
After you've fastened off, it's important to weave in the loose ends so that they are secure and will not work free. Two methods of weaving in ends are shown below. (D102A&B)


Crochet Lessons ©1997 Crochet Guild of America, Diagrams ©1990 TNNA
The Crochet Guild of America extends its utmost appreciation to The National Needlework Association, Inc. (TNNA) and the Craft Yarn Council of America (CYCA) for their assistance with this "How to Crochet" section. We are especially grateful to TNNA for the use of their diagrams.
